The Mount Elbrus climb is a fantastic mountain challenge and an incredibly rewarding experience. But like any serious mountain climb, Elbrus can be dangerous. This inactive volcano is one of the seven volcanic summits.
Below we have provided a summary of useful information that you will want to read before you go. This guide is particularly useful for Elbrus climbs from the south side (i.e. less technical side of the mountain), but also covers information on the North-side approach.
Mount Elbrus Climb Overview
Mount Elbrus is considered the highest mountain on the European continent. The mountain is part of the Caucasus range and is situated on the southwestern side of Russia.
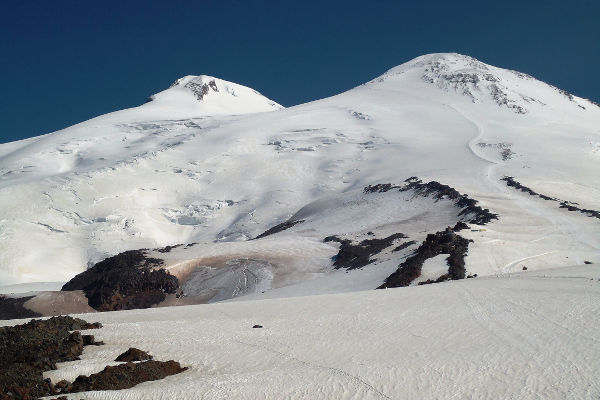
Elbrus consists of two summits, both of which are dormant volcanoes. At 5,642 metres (18,510 ft), the West Summit is the highest, whilst the East Summit stands at 5,621 meters (18,442 ft).
Elbrus was successfully summited via the East summit in 1829, by Khillar Khachirov. In 1874 an English expedition led by F. Crauford Grove reached the West summit. Since then Elbrus has been climbed by 1000s of mountaineers, including some of the world’s best climbers who bag the mountain as part of their Seven Summits bid.

View of Mount Elbrus and it's East (5,621m) and West (5,642m) Summits.
There are two main approaches to Mount Elbrus - the south side approach and the north side approach. The South side is significantly easier than the north side. We estimate summit success rates from the south side of Elbrus at about 80-90%.
In contrast, summit success rates on the North side could be as low as 50%. There are also route options from the Eastern and Western flank of the mountain, but these are very rarely used.
Although Mt Elbrus is not a technical climb, it should not be underestimated. The cold weather and altitude can make the climb pretty challenging and dangerous. Both the south side and north side approach involves basic technical skills, like rope travel, crampons, glacier crossings (North side only) and the use of ice axes on some steep snow slopes.
Due to the number of people who climb Elbrus every year, there are unfortunately a number of deaths on the mountain. We estimate the death rate at Mount Elbrus could be as high as 25 people a year. We don't have statistics on the split between North and South side deaths, but most deaths occur due to bad weather and/or altitude sickness issues.
Climbing Mount Elbrus is a 5-6 day expedition from the South side, and a 6-7 day journey from the North side. Here is a brief summary on the popular routes.
Mount Elbrus VS Mont Blanc
Many people think Mont Blanc is the highest mountain in Europe, but Elbrus is in fact the highest mountain on the European continent. It is part of the Caucasus main range that is considered the border between Europe and Asia.
In terms of difficulty, both mountains are graded PD and are about the same difficulty. In the words of mountaineer, Alan Arnette: "Mount Elbrus is kind of like an extra high Rainier or Mont Blanc".
The main difference is the altitude (4,810m vs 5,642m) making acclimatisation more important on Elbrus. Also, Elbrus is much colder than Mont Blanc and requires more organisation.
Popular Elbrus Routes
There are two main approaches to climb Elbrus - the South and North side routes. Elbrus has several other routes, but these only get a few ascents every year.

Map of the south side routes to the summit. Image credit: Kavkaz Ski Tur
South Side Via The Cable Car
The most popular route on Mount Elbrus is via the south side. If you have limited high altitude mountaineering experience, then this route is for you!
It is the easiest, safest and fastest way to climb Elbrus.
The south side approach from the Azau village uses a unique cable car system to ferry climbers up to 12,500 feet (3,658 m).
From here, you will see the Barrels (bochki). These are steel containers where you will sleep and cook meals. There are three barrel sections on the south side of Elbrus

The Elbrus barrels with the twin summit peak of Mount Elbrus in the background. Image credit: Matteo Leoni
Mir Station (3,500m)
This station is used by day visitors and skiers on Elbrus. At the Mir Station there is a coffee shop and a few souvenir shops. This station is busy and is not a great place to stop unless you are feeling the altitude! Generally climbers continue on a chairlift to Garabashi Station (3,800m).
Garabashi Station (3,800m)
At Garabashi you will find several barrel hut containers. The first few are near the chairlift and are generally quite busy. We recommend walking further up to the top barrel huts as these are quieter, and by staying further up you will shorten your summit push. At Garabashi you will find a few coffee shops (one of which stays open 24 hours). You can charge your phone in these coffee shops, as well as buy food and water.
Shelter Maria (4,100m)
At Shelter Maria you will find large containers, each with a kitchen and gas stove. Shelter Maria's electricity supply stays on until 19:00 each night and the toilet is outside. You will find no drinking water here and no coffee shops. You will need to either melt snow for water or collect water from the streams near by (make sure to bring purification tablets to purify your water). Shelter Maria is a great option to stay at if you are well acclimatised as it shortens the summit push.
Most climbers start their summit climb at the second "Barrels" stop - Garabahsi. The summit climb takes about 8-9 hours of ascent and 3-5 hours to descend. Summit bids start early at around 12am, allowing climbers to have just enough time to get back down to the chairlift, which closes at 16:00pm.
Using Snowcats: From Garabashi it is possible to get a Snowcat or Snowmobile to Shelter Maria and onto Pastukhov Rocks (4700m). This shortens the summit push by a good few hours but is of course cheating and will set you back about $90 pp.

A schematic of the Southern route profile from Azau to Mir, up to Image credit: Kavkaz Ski Tur
North Side Approach to Mt Elbrus
The North side approach to Mount Elbrus is significantly more challenging and, therefore, gets only a few climbers each year.
Unlike the south side, there are no cable cars or chairlifts on the North side. You will therefore need to carry all your gear from base camp, which is situated at about 8,200 feet.
The route includes a glacier crossing where crevasses are a risk. If you decide to do this route option it is important that you and your group have some experience with crevasse rescue and are comfortable using short-rope techniques.
The route is particularly challenging as it includes lots of elevation gain - from ~8,200 feet at base camp to ~18,500 feet, with a 6,000 foot summit push. It also has relatively steeper exposures on snow slopes than the Southern route.
The Northern route is however increasing in popularity due to the high number of climbers on the south side.
Register With The Rescue Centre
Whether you decide to do the south or north route, we recommend registering with the Rescue Centre in Terskol (MCHS) before you set out. They will take your name, surname, passport number, contact phone number and return date. After the climb, you should sign out with them in person or by phone. If you do not sign out they will call you to make sure you made it off the mountain safely. Their contact number is: +7 928 694 51 19 or +7 866 387 14 89.
Before Your Climb

The red cable car that takes climbers from Azau to Mir Station. Image credit: Lev Yakupov
Getting To Mount Elbrus
To get to Mount Elbrus you will need to first fly into Moscow. You will need to get a visa to enter Russia; this can be a lengthy process so please make sure you apply early.
From Moscow you will need to catch an internal flight to Mineralnye Vody Airport or Nalchik Airport. There are also flights from Istanbul to Nalchik. If you are joining an organised tour it is likely that all transport and accommodation before and after the climb will be arranged for you.
If you are planning to climb Elbrus independently or join a group once at the base of the mountain then the information below will be helpful.
There are three towns near Mount Elbrus:
- Terskol: This is the largest town near the mountain, and the best spot to stay in our opinion. The town has a number of accommodation options, including hotels, hostels. homestays and camping facilities (if you are on a tight budget). We recommend the Hotel Elbrusia. You can leave some of your valuables / non-climbing gear at your hotel in safe lock-up for collection when you return from your climb.
- Cheget: This town is furthest from Elbrus but closest to Cheget mountain (3,601m), which most climbers use for an acclimatisation hike before Elbrus.
- Azau: This is the closest town to Elbrus and the location of the cable car that will take you up to Mir Station. Azau is about a 5 min drive from Terskol
From Mineralnye Vody Airport or Nalchik you will need to get a minibus to one of the small towns near Elbrus - Terskol, Cheget or Azau. The journey from Nalchick to Terskol takes about 1.5 hours and costs about $5 in a minibus or $10 in a taxi. The journey from Mineralnye Vody Airport to Terskol takes about 3 hours and costs more.
Please note: It is best to bring Russian rubles in cash with you to Elbrus. There is only one ATM in Terskol and it is often out of cash. Some hotels will exchange US dollars or Euros, but they will not give a favourable rate. When you arrive in Terskol your hotel or hostel will require you to complete registration papers and pay a small registration fee ~$5 - this is a government requirement for all foreigners.
Acclimatisation
Before you climb Mount Elbrus it is imperative that you spend a few days acclimatising. You can do some of this acclimatisation on Mount Elbrus itself, but we recommend undertaking a hike or two before getting the cable car up to Mir Station.
The most popular acclimatisation hikes are on Cheget Mountain and to the Observatory / Terskol Peak (3127m). Both have well marked walking paths and are relatively easy hikes. Just make sure you don't push yourself too hard! These hikes are meant to help you acclimatise to the altitude, so slowly does it!
The views of Elbrus from both peaks is very impressive!
Once on the mountain itself, there are few options for acclimatisation. One of them is a hike to and back from the Pastokov Rocks (4680m) from the barrels - this adds a day to the climb but is well worth it! A conservative approach to climbing Mount Elbrus takes fives days of acclimatisation before attempting a summit bid.
Getting To The Barrels
From Terskol we recommend getting a taxi to Azau where you can get the cable car to Mir Station. There are two cable car options - the old red option (this takes you direct to Mir and is cheaper) or the white option (this is a newer car and more expensive. It also goes via Krugozor station where you have to change cars to get to Mir).
The cars run from 09:00am to 16:00pm (16:30 is the last car down). This is important to remember as missing the last car after descending from the summit will mean staying another night at the barrels.
From Mir you take a one-person chairlift to Garabashi. Please note that you cannot take a pack that is heavier than 10kg on the chairlift! It is possible to walk from Mir to Garabashi (it's about 300m and takes an hour), but most people don't as it can tire one out. It is also possible to walk from Azau to Garabashi, but this will take around 4-6 hours and is pretty tiring!
Pro tip: Make sure that you keep your ticket safe as you will need it to descend. We also recommend leaving Terskol early so you can get on one of the first cable cars up the mountain. This will ensure that you get the best picks of accommodation further up the mountain.
Best Time To Climb Elbrus

A particularly bad day of weather at Krugozor Station (2,900m). Image credit: Lev Yakupov
The main climbing season is from June through early September, with July being the busiest month.
The permanent snow line is around 3350m with temperatures rarely rising above freezing at night.
The best time to ski Mount Elbrus is in June, when there is more snow. This however makes climbing more challenging!
Afternoon clouds and thunderstorms are common during summer season.
Due to its hight, Mount Elbrus has dynamic weather, making it hard to predict weather conditions. Prepare for very cold temperatures and high winds above 4,000 meters.
How Difficult Is The Elbrus Climb?

High on Mount Elbrus. Image credit: Matteo Leoni
From the south side, the ascent of Mount Elbrus is not technically difficult. Climbers only need basic experience in using crampons and ice axes to be well-prepared.
However, in serious weather the climb can be quite hazardous.
Also, despite being technically easy, the lack of high mountain camps on Elbrus (all of them are quite close to each other) causes the elevation gain to be one of the most demanding of the seven summits. Climbers need to ascent as much as 1,900 meters of altitude for the summit push.
The most technically challenging part of the climb is just above the Pastukhov rocks and the saddle between the two summits. The slopes in both these spots are relatively steep and clipping into a fixed rope is highly recommend.
The north side is more challenging as the elevation gain is greater (base camp on the north side sits at around 8,200 meters) and snow slopes are steeper, which means rope work and experience with crampons and ice axes are required.
There are no cable cars, chairlifts or Snowcats on the North side. So one needs to carry all their gear up the mountain.
Besides the technical challenge of climbing Elbrus, the logistics of the climb, if you are not using a tour operator, can be challenging. The visa process via Russian authorities can be lengthy. Also the ethnic conflicts in the area can cause problems.
Training To Climb Mount Elbrus

The West summit of Mount Elbrus (5,642m). Image credit: Jason Blue-Smith
To successfully climb mount Elbrus a good level of aerobic fitness and leg strength is required.
Climbing Elbrus takes roughly a week, including acclimatisation hikes. Summit day is a lengthy one with over 1,900 meters of altitude to be gained, taking about 12-14 hours (descent included).
The climb is also cold, meaning you will lose energy quickly. It is advised to set yourself a training schedule that includes aerobic exercise and long hikes.
Even someone in very good physical shape can fail to summit Mount Elbrus.
You should not be overconfident in your own abilities, because there is the factor of dealing with the altitude that will determine whether you summit or not.
Climbers who are overconfident tend to rush up the mountain and as a result they fail in their attempt to summit.
Here are a few things to implement in your training schedule.
Develop your endurance and stamina
The first thing to do is to make sure you have built enough endurance and stamina before traveling to Russia. Undertaking practice climbs and hikes are the best options, but if you don’t have hills or mountains to climb in your home country, running is a decent alternative. Build a routine, but don’t push yourself over the limit as you will want to avoid injuries.
Get comfortable carrying weight
The ideal way to train is carrying a pack and going uphill and downhill, since this simulates what you will be doing on Mount Elbrus. Start with a light pack and gradually increase the weight as you get closer to the climb. Never run with a pack on and use hiking boots if you can.
Prepare yourself mentally
At some point in your Mount Elbrus climb you will likely find yourself in a difficult situation that is way out of your comfort zone. Cold weather, strong winds and a long summit day will not only be a physical challenge. Make sure that you prepare yourself mentally as well.
Eat well
What you eat during your training weeks and climb should not be underestimated. A diet rich of carbs is as important as your training. It might even be a good idea to consult a professional nutritionist.
Strength training
Training with weights is an important part of your training routine as this improves anaerobic metabolism and feeds much of muscular work you will do on Elbrus. Developing your back and shoulder muscles are necessary to comfortably carry your backpack during the climb, while calve muscles and hamstrings are needed to climb uphill and descend the snowy slopes.
Water
Consume lots of water during your training sessions. Not only does your body need fluids, but it is the best way to get used to hydrating a lot. When you climb in cold conditions, you might not feel thirsty, but it is vital to drink lots of water. Drinking a lot of water helps in getting acclimatised to the high altitude and avoiding dehydration.
Specific skills
Mount Elbrus may well be a basic alpine climb, but it still requires some specific skills including using an ice axe and crampons. Since the slopes are quite steep on Mount Elbrus, being familiar with the ice axe arrest technique is recommended. You can learn these skills on smaller snow-covered peaks in your region or during a winter mountaineering course where you develop / fine tune your skills.
Mount Elbrus Gear List

A Elbrus Snowcat with a number of climber's rucksacks on the front plough. Image credit: Matteo Leoni
An expedition like Elbrus requires some specific gear.
To make sure you don’t forget to bring anything, this is a recommended list of gear to pack, based on our own experience.
Travel Gear
- Passport with valid visa: Entering Russia requires an international passport and visa. Be sure to start your application early as this might well be a time-consuming process.
- 90-120L Duffel Bag: This will be used to carry all your gear to the "barrels". You definitely want the duffel to be waterproof, have back straps and have a capacity of at least 90L. We recommend the Patagonia Duffel (with back-straps) or the Yeti Panga 100 Dry Duffel (this bad boy is the ultimate duffel / dry bag!)
- Daypack: Lightweight 25-30L daypack that will be used as your carry-on luggage for flights, and as your pack for acclimatisation hikes and the summit push on Elbrus. We recommend the Osprey Talon 33L (Unisex).
Climbing Gear
Despite being a relatively straightforward alpine climb, Elbrus requires some mountaineering gear.
- Alpine Ice Axe: Go for a straight shaft ice axe. Choose the right size according to your height; under 5'2'' use a 50 cm axe, 5'3'' to 5'5'' use a 55 cm axe, 5'6'' to 5'9'' use a 60 cm axe, 5'10'' to 6'0'' use a 65 cm axe, above 6'0'' use a 70 cm axe. We recommend Petzl Glacier Ice Axe.
- 12 Point Crampons: Make sure you go for adjustable 12-point crampons. 10-point crampons offer less traction. Avoid single-piece rigid crampons or aluminium frames. We recommend the Black Diamond Sabertooth Crampons.
- 2 Locking Carabiners: Auto-locking carabiners are best. Petzl AM'D Triact Carabiners are good.
- 2 Non-Locking Carabiners: Wiregate carabiners are stronger and better than round-gate carabiners. Go for the Black Diamond Neutrino Wiregate Carabiners.
- Climbing Harness and Accessory Cord: Make sure you go for a newer model of harness, one that has gear loops, adjustable leg loops and a waist belt. Also make sure you bring an 5 foot (6mm) accessory cord. Our recommended harness is the Black Diamond Couloir Harness.
Clothing & Accessories
Elbrus is a cold weather climb, despite being summer season. Freezing temperatures on the mountain are normal. During your summit attempt you will start off in the middle of the night well before sunrise; temperatures as low as -30 degree Celsius are common. Wearing sufficient layers and high quality clothing is important for your own comfort.
Footwear
- Double climbing boots - plastic-shelled models are fine, but modern non-plastic boots are better. We recommend the LA Sportiva Spantik or the Scarpa Phantom 6000.
- Mid-weight hiking boots. We recommend the Salamon Quest (Men's) or (Women's).
- 3 pairs of climbing socks. Smartwool or Bridgedale socks are good.
- Full-sized gaiters. See Outdoor Research Crocodiles.
Lower Body Layers
- 2-3 pairs synthetic underwear.
- Bottom synthetic base under layer. We recommend Smartwool Base Layers.
- Lightweight synthetic hiking trousers. We recommend The North Face L4 Soft Pants.
- Hard shell trousers. These need to be able to fit over your base layer and soft shell pants. Full-length side-zippers are best so you can take on or offer without removing your boots.
Upper Body Layers
- Top synthetic base under layer. We recommend Smartwool Base Layers.
- Lightweight climbing shirt
- Medium weight climbing parka / fleece with hood. We recommend Rab Baseline Jacket.
- Soft shell jacket. Wind and water resistant. Should be able to fit over your fleece. The Arc'Teryx Gamma Jacket is brilliant.
- Hard shell jacket. Must be able to fit over your fleece, an soft shell jacket. The Arc'Teryx Alpha SL is our recommend option.
- Soft shell down winter jacket. The North Face L3 Down Hoodie is excellent.
Headgear and Handwear
- Warm ski hat / beanie
- Buff / Balaclava
- Sun hat
- Ski goggles. We recommend Zeal Optics Goggles.
- Sunglasses - We recommend the Julbo Glacier Explorer Sunglasses.
- Head lamp with extra batteries. Go for the Black Diamond Storm Headlamp.
- Inner gloves - Go for Outdoor Research Base Gloves.
- Insulated climbing gloves. Go for Rab Baltoro Gloves.
- Insulated and waterproof mittens. Go for Outdoor Research Highcamp Mitts.
Other Essentials
- 4-season sleeping bag rated to 0F (-18C). We recommend Mountain Hardwear Lamina or Mountain Hardwear Phantom sleeping bags.
- Inflatable sleeping pad. The Therm-a-rest sleeping pads are great.
- Ski / trek poles. These are highly recommend on Elbrus. Our preferred poles are adjustable and lightweight, like the Black Diamond Trail Trekking Poles.
- 2 wide mouth 1 litre water bottles. Avoid hydration bladders or metal bottles as these freeze. Go for a co-polyester (BPA plastic free) bottle like the Nalgene Titan.
- Insulated bottle covers. Go for the Outdoor Research Water Bottle Parka.
Accessories
- Personal Medications - standard painkillers, personal prescriptions. diamond for altitude and meds for nausea and vomiting. Also bring a small personal first aid kit.
- Water purification tablets
- Lip scream and sunscreen
- Toiletries and toilet paper
- Hand sanitiser
- Ear plugs
- Pee funnel (women) / bottle (men)
- Snacks and drinks, for example energy gels and instant coffee packs and energy bars.
- Toe-warmers
- Altimeter watch. The Suunto Ambit 3 Peak watch is amazing!
- Camera and Book
Typical Itinerary For The Elbrus Climb
The itinerary below is for the most popular south side route:
Depending on where you live, you might be heading for a long flight towards Moscow.
Most climbers spend a day in Moscow before traveling further to the Elbrus region. With highlights like the Red Square and the Kremlin, it is one of world’s most impressive metropoles.
From Moscow, you can fly to Mineralnye Vody or Nalchik Airport, the closest airports to the Caucasus and Elbrus Region. Drive to Terskol from Mineralnye Vody Airport is about 3 hours. It's about an 1.5 hour drive from Nalchik airport.
After having settled in Terskol, the next thing you will probably do is an acclimatisation hike. Terskol Peak (3900m) and Mount Cheget (3404m) are popular options. Both offer great views of Mount Elbrus. If you have an extra day for acclimatisation, a 4 hour walk from the Terskol Valley to the Observatory provides a great first acclimatisation hike.
The next day you move from the Terskol Valley to Barrels (3800m). The easiest approach is to take the cable car system from Azau to Mir Station. From there you can either walk for 1 hour, or take a 1 person chairlift to Garabashi - "The Barrels". It is about a 50 meter walk from the top of the chairlift.
After having settled, it is best to do an acclimatisation hike up to 4,100 meter in the afternoon. ‘Climb high, sleep low’, accelerates adjusting to the altitude.
To complete your acclimatisation process, a hike to Pastukhova Rocks (4700m) is recommended. It takes about 3 hours from the Barrels.
A short night of sleep since you will start your summit bid at 2am or 3am. You will be climbing about 1,900 meters of altitude making for a long summit day (12 hours up and down). Most climbing operators make use of snowcats to start their bid at Pastukhova Rocks (4800m) making their summit day significantly shorter, but true mountaineers don’t use the aid of snowcats.
In case you had bad weather the day before, the summit bid is today. This means that you will not only be summiting today, but will also descend to Terskol Valley. Starting early is recommended to catch the last cable car to the valley (otherwise there is very long descent waiting for you).
After having had a good nights sleep in your hotel in Terskol, you will drive back to Nalchik Mineralnye Vody airport to catch your flight home.
Costs And Permits

Epic picture of climbers pushing up past the Pastukhova Rocks. Image credit: Matteo Leoni
The cost to climb Mount Elbrus ranges depending on how you tackle the mountain. Here are three rough estimates:
Budget Independent Climb
It is possible to climb Mount Elbrus independently. The cost (excl. international and domestic flights) could be as low as $500 pp, but this would be super budget. You will need to budget for your transfers to and from Nalchik, accommodation in Terskol pre and post the climb, cable car journeys, food and water on the mountain and accommodation stays on the mountain.
Climbing with a Local Guide
Their are a number of good Russian guiding organisations who charge about $1000 pp for an Elbrus climb. This often covers accomodation pre and post your climb, all logistics and expenses on the mountain, and a professional guide. Quality can however vary.
Climbing with a Western Operator
There are a number of Western operators who offer Mount Elbrus. Prices range from $2000 to $5000 pp. The service quality tends to be excellent, with professional guides on the expedition. The cost generally includes everything from Moscow and back.
Like on most mountains, you need a permit to climb Elbrus. But unlike the high cost of a climbing permit on Aconcagua (~$1000) or Kilimanjaro (~$1000), Elbrus only costs $25.
Insurance

Helicopter rescue on Mount Elbrus. Image credit: Ilya Bogin
Travel insurance is important when climbing a mountain like Elbrus. If you climb with an guided organisation, you will likely need adequate climbing insurance before joining their tour.
Most general travel insurance providers will not cover Mount Elbrus as the activities of the climb involve high altitude and mountaineering with fixed ropes. You will need to source specialist insurance that covers you for high altitude mountaineering.
We recommend contacting the BMC in the UK or the American Alpine Club in the US.


Hello Mr. Whitman,
I think my earlier comment wasn't posted. My name is Juliana J, and I'm doing a research paper on climbing Mount Elbrus. I'd like to ask you (as an expert) what measures can be taken if someone has a medical emergency during a climb? Also, what type of clothing do you recomend for protection from the cold to deal with the harsh climate, and what happened on your most dangerous Elbrus expedition? Thanks for your time in answering these questions for me.
Hi Juliana, I’m not too sure of the answers. I recommend contacting Vitaly at Russian Mountain Holidays (if you Google them, you will find their site). He is an experience Elbrus guide and should be able to help.
Hello Mr. Whitman,
I think my earlier comment wasn't posted. My name is Juliana J, and I'm doing a research paper on climbing Mount Elbrus. I'd like to ask you (as an expert) what measures can be taken if someone has a medical emergency during a climb? Also, what type of clothing do you recomend for protection from the cold to deal with the harsh climate, and what happened on your most dangerous Elbrus expedition? Thanks for your time in answering these questions for me.
I have an interview for a school project and I want to ask some questions.
1. What measures can you take if someone has a medical emergency during a climb?
2. What type of clothing do you recommend for protection from the cold or to deal with the climate?
3. What happened on your most dangerous Elbrus expedition?
Hi, I’m planning an alpine attempt of Elbrus, starting the trek from Azau (no cheating), both summits in 3 days, tentative 7~9 July 2019; looking for like-minded mountaineers
Hello,
Thank you very much for this detailed report. We are happy to hear that we can climb mount Elbrus independently. We are now looking forward to do the climb this year. Best regards, Doreen and Jean-Christophe
i am flying out to Terskol on 9th october,HOW CAN I GET A MOUNT ELBRUS CLIMBING PERMIT QUICK ?
Hi Michael, Elbrus climbing permits currently cost €25 and can be bought in Elbrus town or from the rangers at the ski lifts.