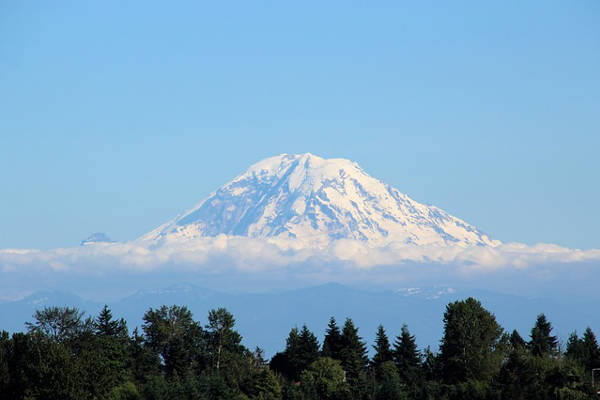
Mount Rainier is famously one of the most beautiful mountains in North America, attracting up over 11,000 climbers per year. If you are interested in joining this throng of enthusiastic adventurers, read on.
Here you’ll find the most common routes up the mountain, a typical itinerary of the climb, the best time to plan your hike for, how to prepare for your alpine journey, and how much it is likely to cost you.
Climbing Mount Rainier

Mount Rainier is known as Tahoma or Tacoma, literally meaning the Great Snowy Peak. It is a stratovolcano located in the Mount Rainier National Park, 87 km south south-east of Seattle.
Mt Rainier hight is 14,410 ft (4,392 m) above sea level. This makes it the highest peak in the state of Washington. Every year, thousands of people successfully reach its summit, which requires an elevation gain of over 2,700 m.
Climbing the mountain requires a good level of physical fitness as well as rigorous conditioning beforehand. This is most important to avoid silly mistakes on the mountain which can be the result of fatigue and lead to avoidable injury.
One of the most notable concerns about climbing Mount Rainier is the unpredictable and rapidly changing weather conditions.
The quality and success of your experience is highly dependent on selecting the right time to climb (see below) – and it is important that you are ready to turn around if the weather unexpectedly turns foul. Harsh, winter-like storms are known to occur even in the middle of summer.
Mount Rainier Common Routes
Although there are more than 50 routes to the top of Mount Rainier, below are summarized some of the most popular options.
Ingraham Glacier-Disappointment Cleaver
Duration: 3 days
Difficulty: Alpine Grade II
Elevation: 2,750m
This is the most popular route and the most common route for guides to escort hikers. The route starts at Paradise, and follows Skyline Trail and the Snowfield Route to Camp Muir.
You will then trek across Cowlitz Glacier until you reach Cathedral Rocks Ridge over which you will pass through the central notch.
This section should be completed as quickly as possible because of dangerously overhanging seracs.
From here you will climb scree to the Ingraham Glacier and cross it to Disappointment Cleaver. Over a snowfield, you will climb to the summit of the mountain.
The descent follows the same route.
Liberty Ridge
Duration: 2-4 days
Difficulty: Alpine Grade III+
Elevation: 2,750m
The climb starts from the White River Campground or the Glacier Basin Trail, from which you will traverse St Elmos Pass and Curtis Ridge to reach the base of Carbon Glacier.
The precarious climb of the Carbon Glacier is followed by a 30 to 40-degree scramble up snowy slopes to Thumb Rock.
From here you have the choice between a direct 70-80-degree short ice pitch across the middle of the rock band, or a more meandering climb around the side of the cliff.
At the top, you will stay near the crest of the ridge where you will climb steeper slopes of up to 50 degrees. Eventually you’ll reach Willis Wall, which consists of exposed snow and icy faces of up to 60 degrees.
After negotiating a number of icy pitches, via seasonal bridges, icy ledges and some short vertical sections up to the Liberty Cap Glacier, you will reach the Liberty Cap Summit.
There is the option now of continuing on to Columbia Crest, or back down onto your descent. You can also head down via the common Emmons-Winthrop route to Camp Shurman.
Kautz Glacier Direct
Duration: 2 days
Difficulty: Alpine Grade III+
Elevation: 2,750m
Beginning at Paradise, you will trek up a paved pathway to Glacier Vista.
You will then follow a trail, descend onto the Nisqually Glacier, cross over it and head towards the base of a gully. From the depths of the gully you will scramble up boulders onto the left of Wilson Glacier.
After crossing sprawling snow fields, you will reach the rocky climbers’ trail leading to a short rappel (possibly fitted with fixed lines). From the depths of a drainage gully, you’ll cross the chute towards the icy ramp, which marks the first technical pitch.
The pitch is 35-40 degrees and about 121 m until the next, easy glacier.
Hereafter, you will navigate your second pitch, which, at around 60 degrees, is steeper than the first, though around the same length.
Glacier travel then resumes until you reach the summit.
Gibraltar Ledges
Duration: 2 days
Difficulty: Grade II
Elevation: 2,750m
The mountain is again approached from Paradise, from which you’ll take the Skyline Trail to Panorama Point.
Across Pebble Creek you will reach Muir Snowfield and then Camp Muir, where your hike will start in earnest.
The mountain will be approached from the edge of Cowlitz Glacier and over Cowlitz Cleaver to the base of Gibraltar Rock.
You will follow the Gibraltar ledges, placing necessary pickets in case of exposure.
Next, you’ll climb up the ice chute to upper Nisqually ice cliff and on to the saddle between Gibraltar Rock and the final slopes.
After crossing the east crater rim, you will arrive at the summit.
Descent options include the climbing route, or via Ingraham Glacier and Cadaver Gap.
Typical Mount Rainier Itinerary
Below is the itinerary for the Ingraham Glacier/Disappointment Cleaver ascent of Mount Rainier, one of the most well-recognized routes to first learn safe glacier skills.
Day 1: Meeting at Headquarters and Pre-climb Meeting
The first day of your hike is typically spent organizing gear, familiarizing yourself with your tour group, learning the rules of the mountain and the National Park and being introduced to the various climbing techniques you will be using throughout your climb.
Day 2: Hike from Paradise to Camp Muir
Duration: 5-6 hours
Distance: 7.3 km
Elevation: 1,400m
You will meet at a location prearranged by your tour group to head towards Paradise (1,652m) in Mount Rainier National Park. You will trek from here through mountainous meadows and snowfields to Camp Muir (3,072m).
On this first day, you will be further informed on some of the key climbing techniques, as well as other basic skills you will need for the trek. The night will be spent at the guide hut at Camp Muir.
Day 3: Practice on Cowlitz Glacier and short trek to The Flats
Duration: 1.5 hours
Elevation: 280m
Day 3 focuses on acclimatization and a spot of skills training on the Cowlitz Glacier, which lies next to Camp Muir. You’ll then transport all your gear across your first official glacier for some real-life practice. You will trek through Cathedral Gap and onto the Ingraham Glacier until you reach a flatter section of the glacier – “The Flats” (3352m), where you will camp for the night.
Day 4: Summit
Duration: 12-14 hours
Elevation: 1,040 m
Summit day starts as early as midnight, when you’ll eat a quick breakfast and get roped up to get going. Starting either on Ingraham Headwall or Disappointment Cleaver, you will eventually reach the snowy upper slopes of the mountain.
After ascending the glacial terrain, you’ll reach summit crater and, finally, the true summit at Columbia Crest (4,392 m). You will then descend the glaciers to The Flats, back down to Camp Muir and onward to Paradise where a van will be waiting to drive you back to Ashford.
Best Time To Climb Mount Rainier

As is often the case with mountain climbing, the best time of the year to climb depends on what you want to prioritize. The summer season (from about May to September) is generally recommended, and this is the time that the touring companies run their operations.
Although this is a guideline to the best time to climb, remember that the weather on Mount Rainier is highly unpredictable so it is always important that you double check the forecast just before you head out.
May - July
In May, there is typically loads of snow, all the way down the mountain. This means that while most of the crevasses are covered – allowing a more direct route to the top of the mountain – there is a higher risk of avalanches.
This time of the year does mean lower numbers of climbers, so if you are looking for a secluded, peaceful hike and are relatively experienced this might be the best time of year for you.
In June, the precipitation starts lessening and the temperature starts warming up. Even though the nights can still be freezing, the day times are generally warm. Crevasses begin to open up, while the mountain melts in the day and then refreezes at night.
The risk of avalanches and rock fall is much higher but you will still be able to experience the mountain without too many fellow climbers to make the hike seem busy.
July is generally the most popular time to climb. This is because the weather is warm and the mountain is relatively safe – although it is still possible for severe storms to occur. The remaining snow on the snowfields allow for an easy descent and glissading.
August - September
The conditions in August are also considered good, although the exposed crevasses can force climbers to take winding, longer paths to the summit.
Novice climbers enjoy the conditions in August because of the tightly packed snow which help to improve fitness, combined with the good weather and glacier conditions. Expect a crowded mountain.
A September ascent is, again, for those who are keen to experience a relatively empty mountain. The exposed crevasses still mean a circuitous route to the summit, although the increasing snowfall does allow for easier climbing. Many tour companies recommend hiking in September as the chance of good weather is high.
If possible, plan your trip mid-week rather than during the weekend.
How Difficult is the Climb
Firstly, although Mount Rainier is possible to summit as a first-time climber, we recommend that you have some experience on other Cascade peaks and make sure that you hire a reputable tour company.
Very few people successfully climb on their own.
The technical difficulty of the climb is almost entirely dependent on the route that you choose.
Disappointment Cleaver and Emmons Glacier are both popular and by far the most doable routes, whereas Liberty Ridge is well known as being a challenging but rewarding option for more experienced climbers.
Every route option to the summit, however, requires that climbers use a helmet, ice axe, crampons, and traveling attached to a rope, so they are all classified as “technical” climbs to some degree.
How Dangerous is the Climb
Mount Rainier experiences about 2 to 3 fatalities every year, mostly as a result of rock or icefall, avalanches, or dreadful weather.
In total, around 100 people have died since 1887, out of the 500,000 people that have attempted the summit. However, it is important to note that your choice of route influences the danger of the climb significantly.
For example, only 2 per cent of the people that hike Mount Rainier climb the Liberty Ridge Route, but this route also accounts for 25 per cent of the mountain mortalities.
Acclimatization
Altitude sickness is a real concern for anyone who plans to spend time at an elevation over 3,000m above sea level.
Because Mount Rainier has an elevation of almost 4,400m at its summit, it is important that any mountaineers planning on confronting this challenge do so fully educated about the potential risks they are taking.
Firstly, the chance that you will experience the symptoms of altitude sickness is unpredictable, and is not correlated to your fitness levels, age or any other known factor.
The only way you will really know if you are likely to be affected is if you have spent time at high altitudes previously.
Secondly, whether you are a first-time high-altitude climber or not, you should understand the characteristic symptoms of the condition. Fatigue, nausea, dizziness and headaches are some of the first signs that you are battling with the effects of altitude sickness.
Fortunately, there are a number of precautions that you can take to minimize the chances of this occurring, including:
- Keep hydrated (drink 3-4 litres of water daily)
- Avoid alcohol and drugs (even sleeping pills have the tendency to push people over the edge into a raging headache)
- Protect yourself from the sun and other d
- Make sure that you have acclimatized to the new altitude properly
- Alert a guide if you are experiencing any of these symptoms, as you may be forced to descend the mountain
Most of the tours incorporate an extra day for acclimatization, so you probably won’t have to worry about this yourself. If you’re hiking on your own, however, make sure that you spend at least 2 nights on the mountain before you attempt your summit.
Gear Check List
The gear list for Mount Rainier is similar to many other cold, multi day hikes. It is a technical climb with a high risk of extreme weather conditions including rain, snow and sun. This means that layering your clothing is the best strategy. As always, avoid cotton and denim.
You’ll need basic personal, technical gear, such as a harness, rope, pickets, carabineers, an ice axe, crampons and a helmet.
Consult your tour company, and check out our recommendations for a refined list of the best, tried and tested equipment.
Permits & Costs
Anyone planning to climb above 3,050 m (10,000 ft.) is expected to pay a climbing fee. As of 2019, this is $50 for adults (25 years and older) and $35 for those between 18 and 25. You will then also be required to obtain a permit, which can be done through several of the Park’s Informational Centers. The permit is free.
Furthermore, there is a limit on the total number of people that is allowed to stay overnight in the camping spots, 40 % of which are set aside for “first come first serve” hikers on the day.
If you are hiking between July 15th and August 15th, we strongly recommend you reserve a spot. Reservations cost $20. Click here to read the current information on the National Park Service website.
For a guided tour, these costs will generally be included, as well as round-trip transportation to Seattle, guide-fees, dinners and breakfasts on the mountain, group equipment (like tents, cooking gear and ropes).
In total, such tours generally cost about $1700, excluding other key expenses such as personal equipment and getting to Seattle.
Getting There
Mount Rainier can only be accessed by car or bus. If you’re travelling from around the world, or even another state, it is easiest to land in the Seattle-Tacoma International Airport.
The drive from Seattle to Paradise takes about 3 hours. Another option is to drive to Ashford (outside the Nisqually entrance) and then take a shuttle to Paradise.
Some facilities are open year-round, while others are sometimes closed or have limited access so make sure that the entrance you are heading to start at is open when you are planning your trip.
Training for Mount Rainier
About 11,000 people attempt the summit each year, and each year half of these people fail – mostly because of bad weather and insufficient conditioning.
To best prepare for this formidable climb, we suggest focusing on the following training strategies:
- Hiking close to your home, preferably on trails with significant elevation gain. On these hiking excursions, make sure you practice carrying a 40 lb backpack – you should be able to manage an elevation of about 600 m in 2 hours, as a benchmark
- Aerobic fitness is important. This can be achieved by running, cycling, swimming or rowing, but make sure you focus most on long distance and endurance. Make sure you run about the equivalent of 25 km every week
- Strengthening exercises for your legs should include squats, lunges and stairs. Again, focus more on repetitions than on heavy weights so as to build endurance.
- If possible, try and climb another mountain in the North Cascades, such as Mount Baker or Mount Adams. These are more manageable but will illustrate the kind of challenge you are in for in climbing Mount Rainier
For beginner with a solid base level of fitness, we recommend that you leave at least 12 weeks for serious training and conditioning.

